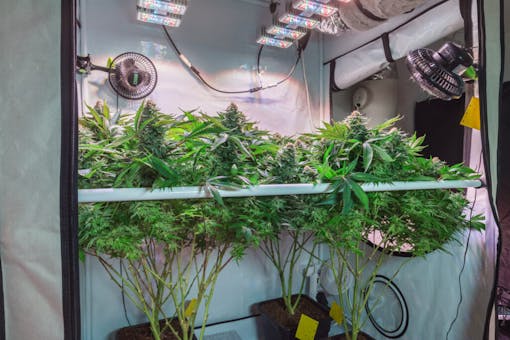
Setting up an indoor weed grow in your home is a lot easier than you may think. You will need to invest some time and money into an indoor grow, but acquiring materials and building it out doesn’t require a lot of skill and can be done cheaply.
This guide will show you how to build three different indoor cannabis garden setups at three different price points. Each build below contains all necessary components needed to create a simple, climate-controlled grow for your weed plants.
All of the hardware used for each project can be ordered online or bought at a local hardware store or grow shop.
Note: Product prices below may fluctuate slightly over time.
How much does it cost to build an indoor grow room?
You can set up an indoor grow for anywhere between a couple hundred dollars to $1,000 or more. We set up an indoor weed homegrow for $500.
The biggest factors that affect the price of a homegrow will be:
- Size of the grow
- Quality of the equipment
You can grow good weed just about anywhere. Even if you don’t have a lot of space or money on a big grow or expensive gear, a small grow with lower quality equipment will still get you good yields and quality weed.
What do you need for an indoor grow setup?
All indoor grows need a few basic things:
- An area dedicated to growing (such as a grow tent)
- Grow light
- Climate control gear—this can be fans, ACs, heaters, or dehumidifiers, depending on the temperature and humidity in the grow space
- Plant containers
- Soil
- Cannabis seeds or clones
It’s also good to set up the grow area by a window to vent the air outside, to reduce the smell of weed.
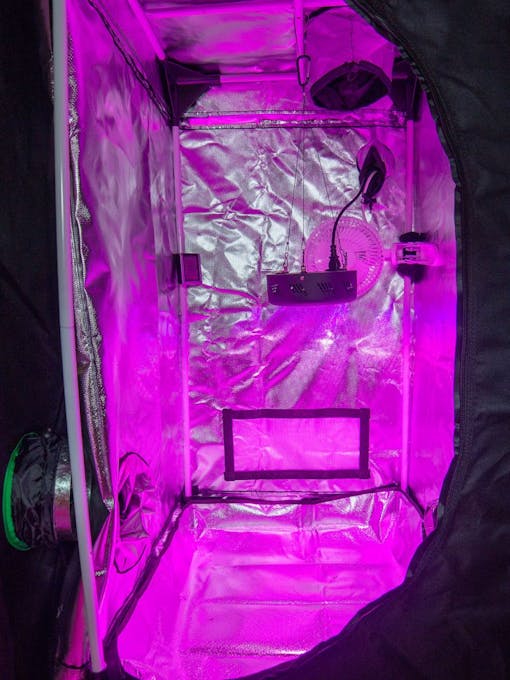
The nano cannabis grow setup: $100-150

Who should use a nano cannabis indoor grow setup?
First-time growers, budget growers, and those who wish to keep their garden as inconspicuous as possible are a good fit for the Nano Grow, as it is a basic grow setup. At 24”x 24”, this tent is small enough to fit in most closets.
Shop highly rated dispensaries near you
Showing you dispensaries nearSupply list:
- TopoLight 24”x24”x48” Indoor Grow Room ($50)
- Lorell 6” Clip On Fan ($14)
- Century 24 Hour Mechanical Timer ($10)
- Growstar 150w Cree LED Full Spectrum UFO Light ($43)
- (Optional) iPower 4” 100CFM Inline Duct Fan ($18)
- (Optional) AcuRite Hydrometer and Thermometer ($12)
Total cost: $117-147
The Nano Grow is designed to be the most budget friendly and least technical design. This build focuses on trimming down the necessary components to eliminate any superfluous items. While the essentials will cost you just under $120, you can add an optional inline fan and thermometer/hydrometer for just a bit more.
LED lights work well in this environment because they produce very little heat. Although filtration for a grow of this size is not necessary, those who wish to grow in a more confined space should consider opting for the intake fan and thermometer/hydrometer. This will help to both increase air circulation and provide some fundamental metrics for maintaining a healthy environment for the plants.
With the tent height maxing out at 48”, plants grown in this space should not exceed 24” in height, so we recommend a small cannabis plant—a dwarf, indica, or autoflower variety for best results.
DIY build notes:
- Assembly time: ~30 min
- Hardware recommendations: Duct tape, heavy-duty zip ties
- Total power outlets required: 2 to 3
- Where to assemble: Closet space or room
- Recommended plant count: 1 to 2 plants
Grow room components:
- Tent: The Topolight grow tent is perfect for a small space or closet and features highly reflective mylar coating on the inside to help provide your plants with optimal lighting.
- Light: The Growstar LED Full Spectrum UFO Light is an inexpensive and efficient fixture designed to provide a spectrum suitable for both vegetative and flowering plants. This light features 30w of Cree LED and emits a blue/purple hue. You also receive the necessary components to hang the light at variable heights in order to follow a canopy as it grows. LED lights do not add any additional heat to the tent and require less filtration to maintain proper temperatures.
- Filtration: A 6” Lorell clip-on fan provides airflow within the tent. Additionally, you may add a 4” 100CFM inline duct fan to provide an intake mechanism to cycle clean air throughout the tent. If you decide to buy the intake duct fan, install it on the bottom of the tent using duct tape and zip ties. The clip-on fan will help move air around inside of the tent. By keeping the top duct port open, air may exhaust passively. If you decide to opt out of the intake duct fan, leave both the bottom and the top port open for air movement.
- Automation: This build comes with a 24-hour mechanical timer designed to keep the light on an automated cycle. Mechanical timers are slightly more affordable than their digital counterparts.
- Climate metering: The basic version of this build does not feature any climate monitoring hardware. However, there is an option to purchase an Acurite thermometer/hydrometer which will allow you to monitor essential metrics within the tent.
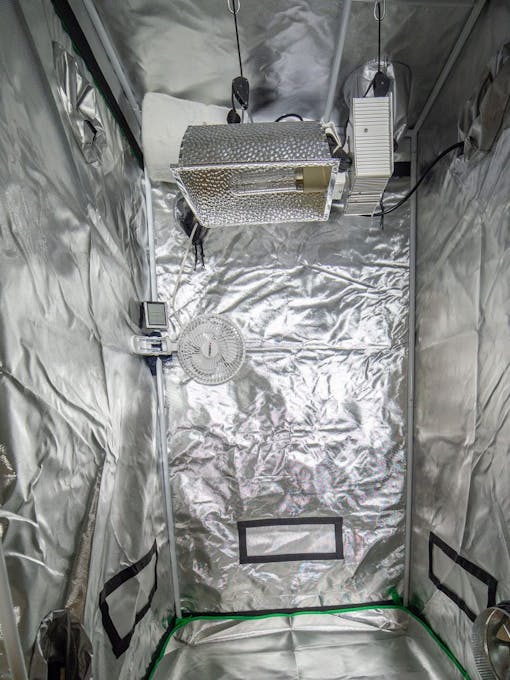
The micro cannabis grow setup: $500

Who should use the cannabis micro grow tent setup?
The Micro Grow is a value-driven package designed to provide all of the essentials for a single tent grow. More advanced than the Nano Grow, it’s a complete system that can handle just about any cannabis growing style.
This build is a perfect fit for a small room or garage space. At 64” tall, the tent affords enough room to propagate most smaller, bushier cultivars. There is a canopy height limit of between 35” and 42”.
In this indoor grow setup, 2 to 4 cannabis plants are recommended. You can squeeze in 6 plants if you grow small auto-flowering varieties and/or vegetate the plants for less time.
Supply list:
- Casolly 32”x32”x64” Indoor Grow Room ($65)
- Century 7 Day Heavy Duty Programmable Digital Timer, Dual Outlet ($13)
- AcuRite Hydrometer and Thermometer ($12)
- Lorell 6” Clip-On Fan ($17)
- Growsun 4” Indoor Grow Exhaust Kit, Carbon Filter, Fan, Ducting ($120)
- VivoSun 6” 240CFM Inline Duct Booster Fan ($21)
- Growneer Variable Speed Vent Fan Controller ($12)
- TopoGrow 315W CMH Grow Light Kit, 120v fixture w/ 3100k Bulb ($177)
- 15 amp GFCI Grounded 5-Outlet Adapter ($29)
Total cost: $466
Unlike the Nano Grow, this build contains a complete ventilation system designed to filter and exhaust hot air while simultaneously bringing in clean, cool air. Additionally, the timer has been upgraded to the dual-outlet digital model for controlling both the light and carbon filter exhaust system. A variable speed vent fan controller is also added for maximum climate control.
With the 315w CMH (ceramic metal halide) lights, enough heat is generated to recommend this build for an open space to allow for the best possible air circulation through the tent. The included 3100k bulb allows you to use the tent for both vegetative and flowering cycles.
DIY build notes:
- Assembly time: ~1 hour
- Hardware recommendations: Duct tape, heavy-duty zip ties
- Total power outlets required: 4 (5-outlet grounded adaptor recommended)
- Where to assemble: Room or garage
- Recommended plant count: 2 to 4 plants
Grow room components:
- Tent: The Casolly 32”x32”x64” Indoor Grow Room provides adequate space for a much more powerful fixture, allowing you to cultivate more plants than the Nano Grow. This tent also features multiple ducting ports for proper air ventilation systems to be installed and comes with a front-sided concealable window for easy monitoring.
- Light: This build features a 120v 315w CMH light fixture from TopoGrow. CMH lights give off far less heat than HID fixtures such as high-pressure sodium (HPS) and metal halide (MH). Complete with a 3100k bulb, this fixture produces a light spectrum conducive to both vegetative and flowering plants, eliminating the need to switch lights between cycles. Even better, this CMH fixture comes with a built-in ballast.
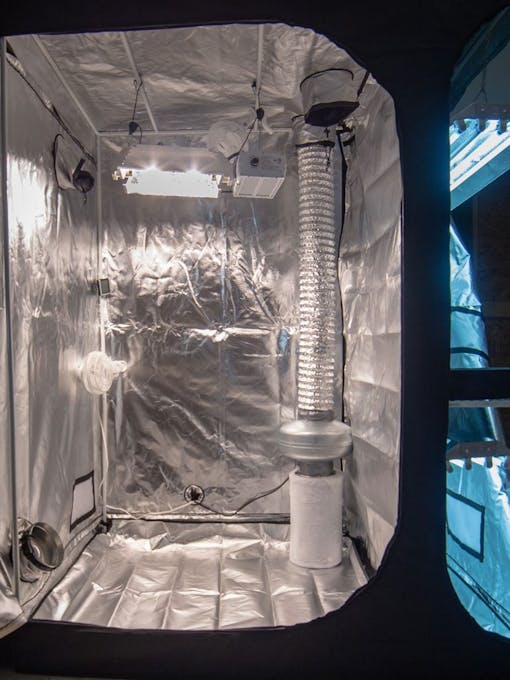
- Filtration: Although CMH fixtures produce less heat than their competitors, there’s still a need for proper ducting and ventilation to remove hot air from the tent. For this build, we chose to pair a Growsun 4” indoor exhaust kit with a 6” Vivosun 240CFM inline duct booster fan. To maintain proper ventilation, a fan speed adjuster has been added. Additionally, a 6” Lorell clip-on-fan is used for airflow over the plant canopy.
- Automation: A dual outlet digital timer is included for tandem use with the carbon filter exhaust and light fixture.
- Climate metering: The Acuright Digital thermometer/hydrometer will help monitor temperature and humidity levels within the tent, making climate control adjustments easier.
- Filtration setup: The 315w CMH generates enough heat to require filtration from the top of the tent. Airflow should be directed upward by installing the 6” duct booster fan at the bottom of the tent using duct tape and zip ties with the 4” carbon filter exhaust system at the top. Use heavy-duty zip ties to fasten the carbon filter at the back of the tent. Duct tape may be used to attach the fan to the filter as well as the filter to the aluminum ducting. Guide the ducting through the top port and fasten it with zip ties and duct tape.
With this system, cool air will enter through the bottom of the tent, and warm air will be scrubbed as it leaves the top of the tent. The 6” clip-on fan should be placed just above canopy level on the back-left pole to help circulate air evenly as the plants mature.
Standard cannabis grow setup: $1,000

Who should use the standard cannabis grow setup?
The Standard Grow offers a complete package for growers who wish to maintain a perpetual cultivation operation year-round. It covers all of the essentials in housing, lighting, automation, and filtration for a standard home grow.
No matter what your legal plant limit is, this tent should be able to handle it. At 80” for the main grow chamber, height is not a problem, and just about any cultivar can be propagated successfully under this build. With a 630w 3100k CMH fixture, this room can be used for both vegetative and flowering stages.
For growers who want a full system capable of germinating seedlings, taking and keeping clones, maintaining mother plants, and have multiple chambers for various projects, this is the build for you.
However, this system tends to run hot and will need the open air of a large room or garage to function optimally.
Supply list:
- 4 Bulb t5 Grow Light Fixture (x2 at $75)
- GrowSun 6” 400 CFM Indoor Grow Exhaust Kit, Carbon Filter, Fan, Time, Ducting ($120)
- TopoGrow 630W CMH Grow Light Kit, 120v Fixture w/ 2 3100k Bulbs ($320)
- AcuRite Hydrometer and Thermometer (x2 at $12)
- VivoSun 6” 240CFM Inline Duct Booster Fan (x2 at $21)
- Lorell 6” Clip-On Fan (x4 at $17)
- Century 7 Day Heavy Duty Programmable Digital Timer, Dual Outlet (x2 at $13)
- TopoGrow 2-in-1 60”X48”X80” Dual Room Indoor Grow Tent ($188)
Total cost: $938
The “Standard Grow” is designed to be a fully comprehensive cannabis cultivation and propagation system, offering an all-inclusive perpetual grow space packed into a 4×5’ build. For just under $1,000, you get a 3-chambered, 3-light tent with a full air filtration system, automation and metering included.
This build allows growers to cultivate at multiple stages in the plant’s life cycle as well as provide housing for multiple propagation projects.
The 4×4’ main tent is powered by a 630w CMH light and the 1×4’ two-tiered tent extension is built out with two 4-bulb t5 fluorescent light fixtures. Complete with four fans, two dual outlet timers, and adjustable intake/exhaust components, this 80” tent supports even the most ambitious of grows.
DIY build notes:
- Assembly time: ~2 hours
- Hardware recommendations: Duct tape, heavy-duty zip ties
- Total power outlets required: 10 (two 5-outlet grounded adaptors recommended)
- Where to assemble: Room or garage
- Recommended plant count: 4 to 12 (flowering)
Grow room components:
- Tent: The shining star of this build is the TopoGrow 2-in-1 60”x48”x80” dual-room indoor grow tent. The main chamber is 4’x4’x6.6” with an attached 1’x4’x6.6” two-tiered chamber. A wire frame separates the two chambers, allowing for two separate propagation rooms. The main and second chambers of the tent are divided by a velcro applied detachable, double-ended mylar fabric barrier.
- Light: This system contains three separate light fixtures. The main room is outfitted with a 120v 630w CMH fixture with double 3100k bulbs, while the two-tiered chamber contains a pair of 12”x48” t5 fluorescent light bulb fixtures (4-bulb) stacked vertically. With this build, the main chamber may be used for both late vegetative and flowering cycles while the side chambers make for fantastic germination and cloning areas for young vegetative plants.
- Filtration: The main chamber of the tent comes with a complete air filtration system. The intake is one 6” inline duct booster fan fastened at the bottom of the tent. A second 6” booster fan removes hot air from the top of the tent and sits just left of the CMH fixture. For exhaust, a 400CFM kit from GrowSun is used. The kit contains a 6” carbon filter, heavy-duty duct exhaust fan (with a speed controller), as well as 6” aluminum ducting. This system may either be fastened to the top back end of the tent via heavy-duty zip ties and duct tape or placed on the ground in the back right corner of the tent. Each set-up allows for exhaust ducting to leave the same top port. The main room receives two 6” clip-on fans, one set up to canopy height and the second fastened to a top support beam directing air towards the light fixture and 6” exhaust fan. The two-tiered side chamber gets a 6” clip-on fan for each room.
- Automation: Two Dual Outlet Century 7 digital timers are used in this build. One controls the light and exhaust fan in the main chamber and the other controls the two fluorescent lights on the side.
- Climate metering: Each chamber receives one Acurite hydrometer/thermometer for climate metering.
- Filtration setup: For the main room, fasten the first 6” booster fan to the bottom-left port of the tent with zip ties and duct tape, directing air inward. The second booster fan should be fastened in the same way on the top-left side of the tent above the first. This fan will direct air out of the tent.
The 6” exhaust kit may either be fastened on the top of the left tent or on the bottom-right, each option directing air through the carbon filter and out of the top port. This room receives two 6” clip-on fans—the first will be fastened to the top-right support beam of the tent to help move warm air towards the exhaust. The second fan can be placed on the back-left corner to follow the canopy as it rises.
For the second room, a 6” clip-on fan is fastened to the back-left support beam of each tier to direct airflow throughout each small chamber.
Alternative indoor grow setups: Using grow kits or marijuana grow boxes
If putting together your own indoor grow seems daunting or too time-consuming, there are even easier options: grow kits and grow boxes.
Grow kits
Like putting together Ikea furniture, grow kits provide all materials and tools needed to build out a small indoor weed grow. Just give yourself an afternoon to put it together, and you’ll be growing weed in no time.
Grow boxes
Another alternative is grow boxes, which require even less time and effort to grow weed. These small devices usually have the space for one seed or clone, and will water it, keep track of the light cycle, and even add nutrients as needed. They are the ultimate set-it-and-forget-it weed growing systems.
The disadvantage to grow kits and grow boxes is that they are more expensive than putting together your own indoor weed grow, with grow boxes being the most expensive. However, if it seems too complicated to put together your own grow, these are great options to grow quality weed easily.
Author’s notes and other considerations:
- All prices are factored in pre-tax/pre-shipping fees.
- Pricing and availability are subject to change.
- Although not included in the inventory list, it is highly recommended that you purchase both 4” and 6” protective screens for each booster fan. Though not available on Amazon currently, these can be purchased at most hardware stores.
Patrick Bennett contributed to this article.
Edited by Pat Goggins
Read more of Leafly’s guide to growing marijuana
- How to grow weed: Basics of growing marijuana
- 4 stages of marijuana plant growth
- Marijuana plant anatomy
- How much weed can you get from growing one plant?
- How to grow weed indoors
- How to grow marijuana outdoors
- How to set up an indoor weed homegrow for under $500
- Top 6 weed strains to grow indoors
- Cannabis seeds 101: How to grow marijuana from seed
- How to clone cannabis plants
- Marijuana seedling and plant care
- How to top and prune marijuana plants
- How to scrog marijuana plants
- How and when to transplant cannabis plants
- How to harvest marijuana plants
- How to trim marijuana
- How to dry and cure cannabis
- Troubleshooting common cannabis plant problems
- Marijuana plant nutrient deficiencies
- Buyer’s guides for cannabis seeds and growing equipment
Ready to start growing your own marijuana?
Buy marijuana seeds on Leafly.
By providing us with your email address, you agree to Leafly's Terms of Service and Privacy Policy.